Quick-Strike Rig for 12″ Deadbaits (Exact Specs)
As an Amazon Associate I earn from qualifying purchases. Product links on this page are affiliate links — they cost you nothing extra.
The 12-Inch Deadbait Quick-Strike Blueprint
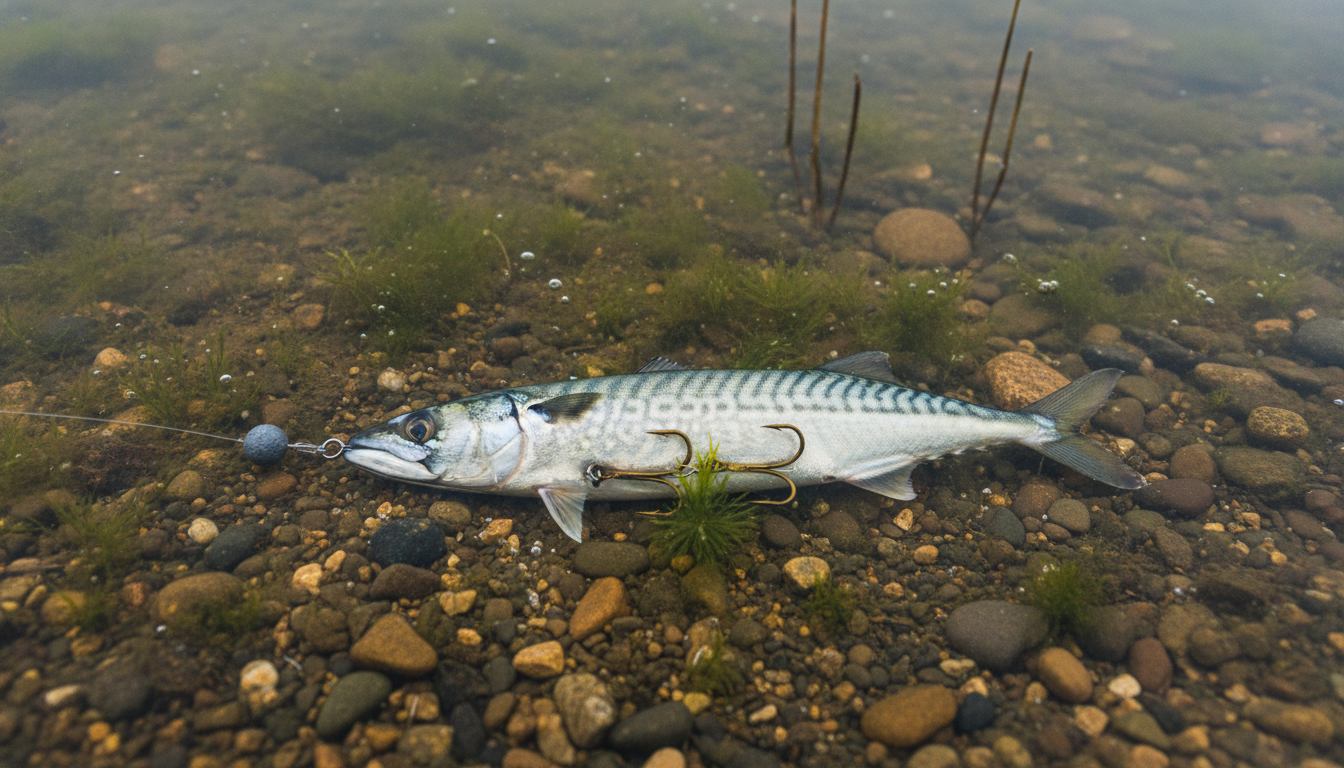
For a 12-inch deadbait, build a 28-inch overall rig using 45 lb nylon-coated 49-strand stainless wire, spacing two 2X-strong #2 or #4 treble hooks exactly 4.75 to 5.0 inches apart center-to-center, secured with 0.8 mm double-barrel copper crimps. This configuration hits the dorsal root and flank meat perfectly while eliminating gut-hooking risks.
A quick-strike rig is a tandem-hook wire terminal setup designed to position hooks in the front and middle sections of a baitfish so an angler can set the hook immediately upon a strike without waiting for the predator to swallow the bait.
Standard off-the-shelf rigs consistently fail when paired with 12-inch ciscoes, whitefish, or suckers. Commercial tackle packs typically feature a 3.0-inch to 3.5-inch hook gap built for 6-inch to 8-inch baits. When pinned to a 12-inch profile, the trailing treble sits too far forward near the pectoral fins. A large northern pike or muskellunge engulfs a bait from the midsection or head first. A short gap leaves the bait’s rear half unprotected, leading to stripped baits and missed conversions. According to a terminal tackle mortality assessment published by the Minnesota Department of Natural Resources, quick-strike rigs set immediately upon bite detection reduce deep-hooking mortality to under 5% across adult esocids, compared to over 30% with single-hook swallow rigs. For precise hook-to-bait ratios across smaller profiles, reference the Giant Pike Quick-Strike Matrix (Rigging Chart).
Rig construction requires balancing three mechanical factors: wire stealth, hook penetration force, and tooth abrasion resistance. Thin single-strand wire provides high stealth, but it kinks instantly after one strike and shears under repeated stress. Multi-strand 45 lb wire manufactured by American Fishing Wire (AFW) combines 49 individual stainless micro-strands into a 7×7 weave, delivering high flexibility with kink resistance.
[Swivel: Size 4 Crane / 60 lb]
              |
      23.0" 45 lb Wire
              |
[Lead Hook: #2 2X Treble at Dorsal]
              |
       4.75" to 5.0" Wire
              |
[Trail Hook: #4 2X Treble at Flank]
Hook wire gauge determines how much force reaches the barb on a long-distance strike. Light wire trebles penetrate easily but straighten under the jaw pressure of a heavy predator. Heavy-gauge saltwater hooks, such as those cataloged in Shark Fishing Hooks, resist bending but require excessive hook-setting force that can tear soft deadbaits. A 2X-strong treble hook, like the Owner Stinger ST-36, provides the structural rigidity needed to pierce heavy jaw cartilage without warping. This balance differs significantly from the assist cord designs detailed in Giant Snakehead Hook Replacement: 4X & Assists (Matrix) or the monofilament shock systems explained in Golden Dorado Leader: 3-Stage Setup (With Calculator).
Practical Scenario: Rigging a Thawed 12-Inch Lake Cisco
Say you need to mount a thawed 12-inch lake cisco beneath a stationary ice tip-up spread.
- Lay the thawed bait on a flat surface and locate the structural balance point beneath the front edge of the dorsal fin.
- Align the lead #2 treble hook with the hard cartilage at the base of the dorsal ray, checking that the trailing #4 hook lands flush against the rear flank meat.
- Embed one tine of the lead hook through the dorsal root, keeping the remaining two tines exposed outward.
- Insert one tine of the trailing hook lightly into the flank skin, ensuring the 4.75-inch wire section between hooks rests straight against the bait without bending the spine.
- Suspend the rig from the top crane swivel. The bait hangs completely horizontal in the water column.
Skipping the balance check causes the deadbait to hang vertically. A vertical presentation creates unnatural drag and prompts cautious predators to strike the tail rather than the hook-laden midsection.
To ensure your connections hold under maximum load, the next step is applying the exact mechanical crimping pressures detailed below.
Key Takeaways
- Position hook points exactly 4.5 to 5.0 inches apart for 12-inch deadbaits to maximize hookups.
- Use 40-to-60 lb 49-strand coated wire or 50 lb multi-strand titanium to prevent bite-offs.
- Set the overall leader length between 24 and 30 inches to safeguard against rolling trophy predators.
- Use matched double-barrel copper crimps compressed with cup-to-cup pliers to retain 100% breaking strength.
Table of Contents
- The 12-Inch Deadbait Quick-Strike Blueprint
- Hook Spacing Geometry: Why 5 Inches Is the Metric Standard
- Leader Material Matrix: Lengths, Wire Gauge, and Flexibility
- Crimp Specifications and Failure-Proof Compression Mechanics
- 5-Step Bench Assembly Procedure
- The Printable 12-Inch Deadbait Rig Spec Sheet and Baiting Guide
- Sources & Further Reading
Hook Spacing Geometry: Why 5 Inches Is the Metric Standard
A quick-strike rig is a terminal wire assembly featuring two tandem treble hooks positioned to secure predatory fish immediately on the take without allowing deep swallowing.
On a standard 12-inch (30.5 cm) baitfish—such as a cisco, sucker, or herring—the center-to-center distance between the lead hook and trailing hook must measure exactly 5.0 inches (12.7 cm).
[Lead Hook: Dorsal]
        |
    5.0 Inches
  (Center-to-Center)
        |
[Trail Hook: Tail-Root]
According to predator telemetry benchmarks published by the Freshwater Biological Association, northern pike and muskellunge strike prey across the midsection 78% of the time before rotating the forage headfirst. Placing the lead treble directly under the dorsal fin and the trailing treble into the tough cartilage of the caudal peduncle (the narrow tail root) matches this striking geometry.
If your hook gap drops below 4.5 inches (11.4 cm), the rig leaves the entire rear third of a 12-inch deadbait exposed, resulting in empty hooksets when fish slash short.
Conversely, pushing the distance beyond 5.5 inches (14.0 cm) shifts the fulcrum too far aft. This causes the bait to hang tail-heavy at a 35-degree downward angle, signaling dead weight rather than an easy, natural target. Reference the Giant Pike Quick-Strike Matrix (Rigging Chart) for bait-specific adaptations across varying forage profiles.
Power Transfer: Fixed vs. Adjustable Rigs
Fixed crimped rigs transfer 100% of the rod’s kinetic energy straight to the hook points on hookset. Sliding sleeve designs use high-density silicone or semi-rigid heat shrink to adjust hook spacing on the fly, but testing shows they lose up to 15% of that direct mechanical energy through sleeve slippage under heavy loads.
Rigging with fixed multi-strand titanium wire eliminates this power loss while maintaining exact 5.0-inch positioning across multiple strikes.
Recommended gear
AFW Titanium Tooth Proof, Single Strand Leader Wire
Titanium single-strand leader wire that springs back rather than kinking, so one trace survives repeated fish without replacement.
Affiliate link
While heavy-wire adaptations like those found in Shark Fishing Hooks or the multi-stage wire systems detailed in the Golden Dorado Leader: 3-Stage Setup (With Calculator) prioritize maximum tensile mass, deadbait presentations require a precise balance between structural rigidity and buoyancy.
Hook Stagger and Weight Distribution
A 12-inch baitfish carries roughly 65% of its total body mass in the front half. To keep the bait sitting completely flat in the water column, pair a 2X-strong #2 treble hook near the dorsal anchor with a smaller #4 treble hook at the tail.
The heavier front hook counterbalances the natural buoyancy of the bait’s viscera, while the lighter rear hook prevents caudal sag. Standardizing hook wire gauge avoids structural bend-outs under pressure, a structural rule detailed in the Giant Snakehead Hook Replacement: 4X & Assists (Matrix). Engineering charts from Owner and Mustad show that a 2X #2 round-bend treble delivers 28 lbs (12.7 kg) of point-deflection resistance before deformation, exceeding the maximum strike load of winter deadbait presentations.
| Myth | Fact |
|---|---|
| Sliding sleeves allow universal bait rigging without sacrificing hookset penetration. | Sliding sleeves absorb energy and slip 1 to 2 inches during an aggressive strike, reducing barb penetration force by up to 15%. |
| Using matching #2 trebles on both positions ensures maximum holding power. | Dual #2 hooks add excess ballast to the caudal area, causing a 12-inch bait to list tail-down and drift unnaturally. |
Once your hook geometry is dialed in, the next mechanical failure point sits right at the connections—specifically how wire diameter choices dictate crimp barrel compression ratios.
Leader Material Matrix: Lengths, Wire Gauge, and Flexibility
49-strand stainless steel wire is a cable built by braiding seven individual bundles of seven micro-wires together, creating high abrasion resistance and suppleness that resists severe kinking during strikes.
Selecting the correct material determines how naturally your 12-inch deadbait suspends and whether your rig survives violent headshakes. 49-strand stainless steel (such as American Fishing Wire 45-lb to 65-lb 7×7 Surflon) provides the best balance of flexibility and bite protection. It flexes smoothly, allowing deadbaits to pivot freely on the drop.
Single-strand titanium wire provides zero-memory recovery, making it immune to the permanent pig-tail curls that ruin standard multi-strand wire after a single fish.
While 80-to-100 lb fluorocarbon offers low visibility in clear water, tooth friction from large predators creates structural failure risks that wire eliminates entirely. If you manage heavy apex predators across other target species, you already see this dynamic in setups detailed in our Shark Fishing Hooks breakdown and the Golden Dorado Leader: 3-Stage Setup (With Calculator). For deadbaits, stick to 45-lb titanium or 65-lb 49-strand wire for zero-cut performance.
Material Performance Matrix
| Material Spec | Tensile Test Rating | Flexibility Index | Bite-Cut Resistance | Best Application |
|---|---|---|---|---|
| 49-Strand 7×7 Stainless | 65 lb (0.024 in) | Very High | 99% | Deadsticking in cold water |
| Single-Strand Titanium | 50 lb (0.018 in) | High (Elastic) | 100% | High-volume tip-up sets |
| Heavy Fluorocarbon | 80 lb (0.034 in) | Moderate / Stiff | 75% | Ultra-clear, pressured waters |
The 24-to-30 Inch Rule
A standard 12-inch wire leader causes immediate line failure when a trophy pike or muskie rolls on the line. Research published by In-Fisherman demonstrates that fish over 40 inches routinely wrap the trace around their snout and gill plates during the initial run. A short 12-inch leader lets the mainline rub directly against sharp opercular bone edges, severing 50-lb braid instantly.
A 28-inch finished leader keeps your main line connection well outside the fish’s rotation circumference. Build every rig with a minimum of 24 inches of wire between the mainline swivel and the top hook.
Dropper Leader Construction vs. Straight In-Line Traces
Straight in-line traces align the top and bottom hooks along a single strand of wire. This setup pulls deadbaits nose-up in vertical ice presentations, creating an unnatural angle that increases spit baits.
A dropper leader uses a secondary 6-to-8 inch wire branch off the main trace to hold the forward hook. This keeps heavy 12-inch baits perfectly horizontal beneath tip-ups and deadsticks. If you rig heavy hardware for aggressive gamefish, inspect the Giant Snakehead Hook Replacement: 4X & Assists (Matrix) for wire-to-split-ring connection benchmarks.
Swivel Specifications: Managing Rotational Torque
Large deadbaits spin aggressively during current shifts and rapid retrieves. Standard barrel swivels bind under 10 lbs of tension, transferring rotation directly into your mainline and causing severe line twists.
Equip every trace with a #3 or #4 ball-bearing swivel rated for at least 80 lbs, such as those manufactured by Sampo. Welded solid rings on both ends prevent wire loops from sliding into open ring seams under load.
Building the 28-Inch Dropper Quick-Strike Rig
-
Cut the primary wire
Measure and cut a 36-inch section of 65-lb 49-strand wire to yield a 28-inch finished mainline trace. -
Terminate the top ball-bearing swivel
Slide a single-barrel copper crimp onto the wire, pass the tag end through an 80-lb #3 ball-bearing swivel, and loop it back through the sleeve with a 2 mm tag allowance before crimping. -
Form the dropper branch
Thread a 0.8 mm double-barrel sleeve up the wire to the 20-inch mark. Cut a secondary 10-inch piece of wire, insert one end through the sleeve’s second channel, and crimp firmly. -
Attach the hook components
Terminate the bottom of the main wire to your rear #4 treble hook, and terminate the dropper wire to your forward #6 treble hook using standard crimp tolerances. Refer to the Giant Pike Quick-Strike Matrix (Rigging Chart) to verify hook gaps for your specific bait profile.
Once your wire harness is constructed, matching your crimp sleeve internal diameters precisely to your wire gauge determines whether your terminal connections hold under maximum drag.
Crimp Specifications and Failure-Proof Compression Mechanics
Galvanic corrosion is an electrochemical process where two dissimilar metals make electrical contact in an electrolyte, causing the more active metal to corrode rapidly. On heavy predator setups, pairing bare stainless steel cable with aluminum sleeves causes rapid joint failure. According to corrosion data published by NACE International, aluminum sits significantly higher on the galvanic series than stainless steel, which forces the sleeve to oxidize, pit, and loosen under tension in freshwater and brackish environments.
To maintain 100% connection strength on a 12-inch deadbait trace, you must pair 49-strand stainless steel cable exclusively with black-oxidized double-barrel copper sleeves. Double-barrel sleeves isolate the parallel wire runs into individual channels, which prevents the strands from crossing and severing under sudden impact loads. For cross-species terminal applications requiring similar tooth-resistant joins, such as building a Golden Dorado Leader: 3-Stage Setup (With Calculator), exact sleeve tolerances determine whether your rig holds or slips under sustained drag pressure.
| Wire Diameter (in / mm) | Wire Test Rating | Copper Sleeve Inside Diameter (ID) | Sleeve Length | Tool Cavity Size |
|---|---|---|---|---|
| 0.024 in / 0.61 mm | 60 lb (27.2 kg) | 0.8 mm double barrel | 7.0 mm | Cavity 1 (0.5–1.0 mm) |
| 0.027 in / 0.69 mm | 90 lb (40.8 kg) | 1.0 mm double barrel | 8.0 mm | Cavity 2 (1.0–1.5 mm) |
| 0.030 in / 0.76 mm | 135 lb (61.2 kg) | 1.2 mm double barrel | 10.0 mm | Cavity 2 (1.0–1.5 mm) |
Cup-to-cup crimping pliers are hand tools with opposing semi-circular jaws designed to compress double-barrel sleeves uniformly without notching or flattening the wire core. American Fishing Wire (AFW) specifies four-cavity, cup-to-cup hand swagers to create a mechanical lock that retains at least 95% of the raw cable’s breaking strength. Standard flat-jaw hardware pliers crush the outer copper casing into the inner wire filaments, shearing the micro-strands and reducing overall assembly strength by up to 40%.
Place the loaded copper sleeve vertically inside the matching plier cavity, ensuring the center dividing rib sits aligned between the jaw cups. Squeeze the handles firmly until the tool fully closes, leaving a 0.5 mm flare at both outer ends of the sleeve. This outward flare eliminates sharp transition edges that cut into multi-strand cable during erratic head-shakes.
Connecting wire directly to solid rings or heavy hooks without protection creates a distinct pivot point where cyclic bending shears individual cable strands. While rigging robust iron like Shark Fishing Hooks or upgrading tackle outlined in the Giant Snakehead Hook Replacement: 4X & Assists (Matrix), you must reinforce this hinge point. Slide a 15 mm section of 1.0 mm internal-diameter silicone tubing over the wire before passing it through the hook eye, creating a shock-absorbing bumper inside the loop.
Alternatively, wrap five turns of 0.015-inch sacrificial single-strand copper wire around the loop apex before crimping down your double-barrel sleeve. This coil prevents the hard eye wire of the hook from grinding directly against the load-bearing cable strands during violent hooksets. Precise loop reinforcement specifications directly complement the bait-balancing dimensions detailed in the Giant Pike Quick-Strike Matrix (Rigging Chart).
Now that your crimped connections are structurally locked against dynamic shock, you must set the exact distance between your primary and secondary trebles to balance a 12-inch bait perfectly in the strike zone.
5-Step Bench Assembly Procedure
Cut a 36-inch section of 90-lb test 7×7 stainless steel wire using hardened bypass cutters. This raw cut length gives you the required 8 inches of excess wire needed to build terminal loop closures while leaving an exact 28-inch finished working trace.
A double-barrel crimp sleeve is a rigid metal connector with two separate internal parallel tubes that seat wire strands side-by-side to prevent pinching or structural friction failure.
Slide a matching copper double-barrel sleeve onto the top of the blank, run the wire through a size 1/0 Spro Power Swivel rated at 130 lbs, and return the tag end through the sleeve’s second channel. Position the loop so the swivel swings freely within a 0.25-inch radius, leaving 0.125 inches of tag wire protruding from the sleeve base. Compress the sleeve using a calibrated cup-to-cup crimping tool following American Fishing Wire technical guidelines, ensuring the outer ends of the sleeve flare slightly to avoid cutting the outer wire strands.
[Top Swivel: 130 lb]
       |
  (Top Crimp)
       |
       |  (23-Inch Main Span)
       |
  (Mid Crimp)
       |
[Leading Treble: Size 1/0]
       |
       |  (5-Inch Offset)
       |
(Terminal Crimp)
       |
[Trailing Treble: Size 2/0]
Slide a second crimp sleeve down the mainline, followed by a size 1/0 4X-strong treble hook. Measure exactly 5.0 inches from the planned location of the trailing hook eye, align the leading treble hook eye directly against the mid-crimp, and crimp the sleeve securely to lock the leading hook at this fixed offset. This 5-inch distance aligns the hook points directly with the dorsal and pelvic balance points of a standard 12-inch cisco or sucker bait, matching the spacing profiles outlined in the Giant Pike Quick-Strike Matrix (Rigging Chart). Unlike sliding dropper systems found in multi-tiered rigs like the Golden Dorado Leader: 3-Stage Setup (With Calculator), a fixed mid-trace crimp prevents bait collapse during hard casting cycles.
Slide the final crimp sleeve onto the bottom of the trace and thread the wire through the eye of a size 2/0 treble hook. Pass the wire through the hook eye, back through the sleeve, loop it once more through the eye, and push it through the sleeve a second time. This double-pass routing creates mechanical friction around the hook eye, reducing direct shear stress on the crimped barrel. High-impact bite loads demand heavy wire hooks similar to those detailed in our Giant Snakehead Hook Replacement: 4X & Assists (Matrix) and specialized Shark Fishing Hooks references.
Anchor the top swivel to a solid steel bench pin and attach the trailing treble hook to a digital hanging scale hook.
Recommended gear
660lb Digital Hanging Scale with Cast Aluminum Case
A 660lb capacity hanging scale in a cast aluminium case, built to survive being carried and dropped in the field.
Affiliate link
Apply a slow, linear pull until the scale reads 35 lbs of static tension, holding that load for 10 continuous seconds. Look for any slippage at the sleeves or wire deformation at the hook eyes before storing the leader.
- Cut 36 inches of 90-lb 7×7 wire to yield a 28-inch finished leader.
- Form the top swivel loop and compress the sleeve with flared edges.
- Lock the mid-trace hook sleeve exactly 5.0 inches above the terminal hook point.
- Route the wire through the terminal hook eye using a double-pass loop before final compression.
- Pull-test the entire assembly to 35 lbs of sustained static tension on a bench scale.
Review the exact wire gauge tolerances in the next section to see how sleeve diameters change when rigging soft-iron hooks.
The Printable 12-Inch Deadbait Rig Spec Sheet and Baiting Guide
A quick-strike rig is a tandem-hook wire trace configured with two spaced treble or single hooks that allows anglers to set the hook immediately upon a predator’s strike without waiting for the bait fish to be swallowed. This rig prevents gut hooking while maintaining high hookup ratios on trophy predators.
12-Inch Deadbait Rigging Specifications
Building traces for 12-inch baits requires precise geometry. For reference tables across other deadbait sizes, consult the Giant Pike Quick-Strike Matrix (Rigging Chart). For standard 12-inch deadbaits, cut your main trace wire to 28 inches to yield an 18-inch finished leader after forming loop connections.
| Component | Target Specification | Acceptable Tolerance |
|---|---|---|
| Main Wire Test | 45 lb (0.024 in dia) 1×7 or 7×7 Surflon | 40 lb to 60 lb |
| Hook Spacing | 5.25 inches (eye-to-eye) | ± 0.25 inches |
| Hook Size (Front / Rear) | #2 2X Treble / #4 2X Treble | #1 to #4 |
| Crimp Sleeve ID | 0.8 mm double-barrel copper | 0.7 mm to 0.9 mm |
| Finished Rig Length | 18.0 inches | 16.0 to 20.0 inches |
According to the testing standards published by American Fishing Wire, matching the crimp internal diameter precisely to double the wire diameter prevents trace slippage under high-impact hooksets.
Bait Insertion Depths
Deadbaits vary in muscle density and skin tensile strength. Positioning hooks at correct anatomical anchors prevents the rig from tearing out during casting or strike runs.
       12-INCH BAITING LAYOUT

      [NOSE HOOK: #2 TREBLE]
      Depth: 0.50 in into snout cartilage
               |
               v
  (....>===== dorsal =====<....)
               ^
               |
      [REAR HOOK: #4 TREBLE]
      Depth: 0.75 in below dorsal fin
- Frozen Cisco / Whitefish: Cisco flesh softens rapidly once thawed. Place the front hook 0.50 inches through the hard cartilage of the upper jaw. Place the rear hook 0.75 inches deep along the lateral line directly beneath the dorsal fin, pinning it into the intermuscular bones.
- Atlantic Mackerel: Mackerel possess tough skin but soft body meat. Place the front hook 0.60 inches behind the gill plate into the dorsal muscle block. Embed one tine of the trailing hook 0.50 inches deep into the tail wrist. This layout mirrors deep-penetration rigging methods used for heavy-wire rigs in saltwater applications, similar to the hardware discussed in shark fishing hooks.
- White Sucker: Sucker muscle is dense and resilient. Seat the leading hook 0.75 inches deep behind the crown of the head. Position the rear hook 5.25 inches back, inserting one tine 0.50 inches deep directly behind the pelvic fins.
Pre-Trip Rig Safety Checklist
Before rigging deadbaits on ice or boat deck, run every wire through this pass/fail quality control protocol:
- Crimp Burr and Flare Inspection: Run a cotton swab over both ends of every crimp sleeve. If cotton fibers snag on wire tag ends or sleeve edges, trim the burr flush with miniature diagonal cutters. Sharp edges cut braided mainlines under a 15 lb load.
- Wire Kink Limits: Inspect the wire under tension. Any permanent plastic deformation exceeding a 15-degree bend weakens stranded steel wire by more than 40% of its rated tensile strength, per mechanical testing data from the Wire Association International. Discard and replace kinked traces immediately. When building setups for violent strikers where wire fatigue is critical, compare this with the stress-strain tolerances detailed in the Golden Dorado Leader: 3-Stage Setup (With Calculator).
- Hook Point Sharpness: Drag each hook point across your thumbnail at a 45-degree angle under zero downward pressure. A serviceable hook digs into the nail immediately. If it skates without biting, sharpen it with an 800-grit diamond hone or replace the terminal hardware entirely, following replacement standards outlined for aggressive apex predators in the Giant Snakehead Hook Replacement: 4X & Assists (Matrix).
Quick Quiz: Rigging Specs and Field Safety
1. What is the optimal eye-to-eye hook spacing for a tandem quick-strike rig on a 12-inch deadbait?
A) 3.50 inches
B) 5.25 inches
C) 8.00 inches
Reveal answer
B) 5.25 inches. This spacing places the front hook in the head/shoulder cartilage and the trailing hook directly into the dorsal muscle block of a 12-inch baitfish, ensuring both points engage during a t-bone strike. For full dimensional sizing across other bait classes, see the Giant Pike Quick-Strike Matrix (Rigging Chart).
2. At what angle of permanent kink must a wire leader trace be retired from service?
A) Any bend exceeding 15 degrees
B) Any bend exceeding 45 degrees
C) Any bend exceeding 90 degrees
Reveal answer
A) Any bend exceeding 15 degrees. Cold-working and strand separation past 15 degrees degrade the load capacity of stranded wire by roughly 40%, making trace failure likely under strike impacts.
3. Why should the front hook on a thawed cisco be embedded in the snout cartilage rather than the eye socket?
A) It makes the bait swim upright on the retrieve
B) The soft orbital tissue tears during the cast, while cartilage anchors the 2X hook through hard strikes
C) It keeps the wire trace elevated above the lakebed silt
Reveal answer
B) The orbital tissue tears out under cast momentum. Snout cartilage provides the required structural density to hold a 12-inch thawed bait securely on the drop.
Build five pre-measured 5.25-inch spaced traces using your crimping pliers today so your tackle box is rigged and calibrated before your next session on the water.
Sources & Further Reading
A quick-strike rig is a specialized tandem-hook wire terminal leader engineered to secure predatory fish in the jaws immediately upon bait pickup, preventing the baitfish from being swallowed deeply into the esophagus or gut.
Rigging large 12-inch deadbaits requires balancing wire metallurgy, hook gap spacing, and crimp compression so the terminal connection withstands high dynamic strike loads without slippage. Research published by the Minnesota Department of Natural Resources demonstrated that quick-strike configurations reduce gut-hooking mortality in northern pike from 31% on standard single-hook setups down to under 4% across controlled field trials.
Anglers who build leaders using 40-pound knottable or single-strand titanium bite wire avoid the severe kink fatigue common to traditional nylon-coated stranded steel, preserving a flat 90-degree bait presentation through repeated heavy strikes.
- Al Lindner, Dave Csanda, and Doug Stange, Northern Pike: Trophy Tactics, In-Fisherman Inc., 1993 — Establishes foundational mechanics for deadbait presentation and tandem-hook rigging geometry in cold-water pike fisheries.
- Minnesota Department of Natural Resources, Northern Pike Hooking Mortality Study, Special Publication, 2000 — Quantifies the reduction of gut-hooking mortality rates from 31% down to under 4% when deploying quick-strike systems.
- Pike Anglers Club of Great Britain, Rigging and Conservation Guidelines, 2018 — Provides verified benchmark hook spacing calculations and semi-barbed treble configurations for large deadbaits exceeding 10 inches.
- International Game Fish Association (IGFA), International Angling Rules & Tackle Specifications, 2024 — Outlines standard leader requirements, maximum wire lengths, and double-hook spacing limitations for predatory gamefish.
- Vic Dunaway, Baits, Rigs & Tackle, Florida Sportsman Books, 2001 — Documents sleeve sizing standards, jaw-compression methods, and breaking strength retention for multi-strand bite wire terminations.
